If you’ve used a Dell laptop long enough—whether it’s an Inspiron, Latitude, XPS, Vostro, or even a Dell desktop—you already know that Windows gives you several ways to capture what’s on your screen. But depending on your keyboard layout, function key settings, or the version of Windows you’re running, the process isn’t always obvious. That’s exactly why so many people still search how to screenshot on Dell laptop, how to take a screenshot on Dell laptop, or even how do you screenshot on a Dell computer.
After nearly a decade of troubleshooting Windows systems, I can say this confidently: Dell devices don’t complicate screenshots—Windows does. Different shortcuts behave differently, and some tools work better than others depending on what you’re trying to capture. This guide breaks it all down in a clear, reliable way that works on Windows 11, Windows 10, and the 2026 Windows updates.
Using the Print Screen Key (Still the Fastest Method)
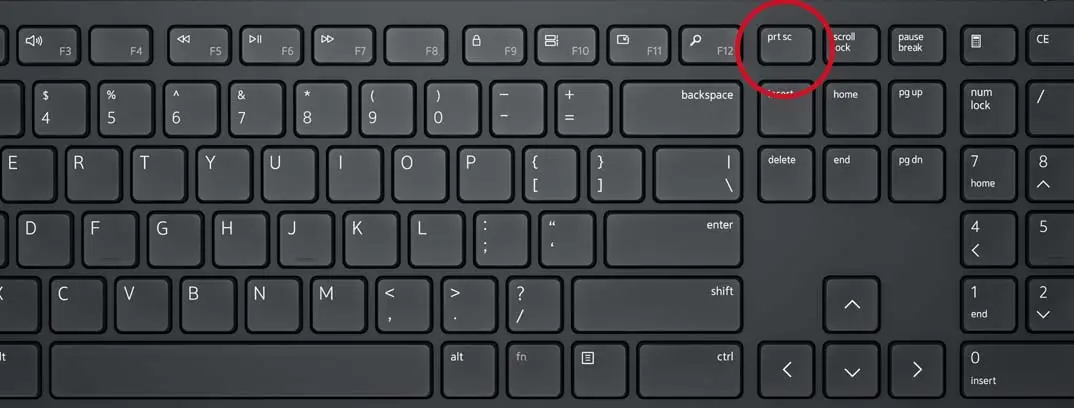
The Print Screen key—labeled PrtSc, PrtScn, or paired with the Fn key—is usually the quickest way to take a screenshot on a Dell laptop. Even though many users assume this key is outdated, it still works flawlessly on modern Dell systems.
Pressing PrtSc captures your entire screen and copies it to the clipboard. You won’t see a notification, but you can paste the screenshot immediately into Paint, Word, an email, or anything else using Ctrl + V. If someone asks, “how do you screenshot on a Dell laptop?”—this is still the simplest answer.
If you want Windows to save the image automatically, use Windows + PrtSc. Your screen will briefly dim, and the image will appear inside your Pictures > Screenshots folder. This is especially useful if you’re preparing documentation or troubleshooting a Dell computer and need multiple images saved quickly.
There’s also a shortcut for capturing just one active window: Alt + PrtSc. Instead of grabbing your entire display, Windows captures only the window you’re working in. It’s helpful when you want a clean screenshot without extra desktop clutter.
Snipping Tool: The Most Accurate Way to Screenshot on Dell
Over the years, Microsoft has replaced three different screenshot utilities with one unified tool: Snipping Tool. It’s now the most accurate and dependable way to take a screenshot on a Dell laptop or Dell desktop running Windows 11 or 10.
You can launch it instantly with Windows + Shift + S. When the screen fades and the capture bar appears, you can choose between four modes: rectangular snip, freeform snip, window snip, and full-screen snip. It feels far more natural than using Print Screen—especially when you need only part of the screen or when capturing error messages during troubleshooting.
After taking the screenshot, the Snipping Tool opens automatically so you can annotate, crop, or save it. If you routinely search how to take screenshot on Dell or how to screenshot on Dell computer, this tool is likely the method you’ll rely on most.
Capturing Gameplay or Apps with Xbox Game Bar
Dell’s gaming systems—especially Alienware and G-Series laptops—benefit from Xbox Game Bar. It not only captures screenshots but does so even inside fullscreen games where traditional shortcuts sometimes fail.
Press Windows + G to open the overlay, or skip straight to a screenshot with Windows + Alt + PrtSc. These images save automatically in Videos > Captures. For gaming, app tutorials, or high-motion content, this method is far more reliable than standard shortcuts.
Screenshots on Dell Desktops Work Exactly the Same
Many users are unsure whether the process differs on a Dell desktop tower versus a Dell laptop. The truth is: nothing changes. Whether you’re on an OptiPlex, XPS desktop, or Precision workstation, the shortcuts for how to screenshot on a desktop Dell are identical to laptop shortcuts:
- PrtSc
- Alt + PrtSc
- Windows + PrtSc
- Windows + Shift + S
No special Dell utilities are needed.
Also Read: Please Wait for the GPSVC Message on Windows 10 and 11
What to Do If Print Screen Isn’t Working on Your Dell Laptop
A non-responsive PrtSc key is one of the most common issues I’ve seen over the years. Fortunately, the fix is usually simple.
The first thing to check is Windows’ accessibility setting. Go to Settings > Accessibility > Keyboard and make sure the option that lets Print Screen open Snipping Tool is turned on. Many users disable this without realizing it, causing Print Screen to appear broken.
If the physical key doesn’t respond at all, open the On-Screen Keyboard from the Start menu. It includes a virtual PrtSc button that works even when your keyboard doesn’t.
Finally, updating Dell keyboard drivers via Device Manager is always a safe step, especially after system updates. Outdated drivers can occasionally interfere with screenshot shortcuts.
Taking Scrolling Screenshots on Dell (Full Webpages or Long Documents)
Windows still doesn’t offer a built-in scrolling screenshot tool, but Dell users have reliable alternatives. Microsoft Edge includes a Web Capture feature that lets you grab entire webpages from top to bottom. For apps, PDFs, or software windows, tools like Snagit, ShareX, or PicPick allow smooth scrolling captures that Windows cannot achieve on its own.
If you regularly need long-form screenshots—tutorial creators, IT professionals, analysts—these tools are worth installing.
Also Read: How to Fix Windows Key + Shift + S Not Working
Choosing the Right Screenshot Method for Your Dell Laptop
Each method has its place. From field work with Dell enterprise devices to troubleshooting home laptops, here’s the guidance I typically give:
- For fast captures: PrtSc
- For automatic file saving: Windows + PrtSc
- For window-only screenshots: Alt + PrtSc
- For clean, precise captures: Windows + Shift + S
- For gaming and fullscreen apps: Windows + Alt + PrtSc
- For long webpages/documents: use Web Capture or a third-party tool
These methods reliably cover every scenario on Dell laptops and Dell desktop computers.
Final Thoughts
Once you understand how each shortcut behaves, taking a screenshot on a Dell laptop becomes second nature. Windows offers multiple options because no single method fits every situation. Whether you need a quick capture, a precise crop, a long scrolling screenshot, or a gaming snapshot, Dell’s hardware and Windows’ tools work together smoothly.
So whether you came here searching how to take a screenshot on Dell laptop, how to screenshot on a Dell, how to take a screenshot on a Dell computer, or how do you screenshot on Dell computer—you now have a complete, practical guide that works on any Dell device in 2026 and beyond.
FAQ
1. What is the easiest way to screenshot on a Dell laptop?
The simplest method is pressing PrtSc, which copies the full screen. If you want a clean, precise capture, Windows + Shift + S is the most dependable.
2. Why is the Print Screen key not saving images on my Dell?
Print Screen often only copies the image to your clipboard. To save automatically, use Windows + PrtSc or check your keyboard settings under Accessibility to ensure the Print Screen function is enabled.
3. How can I take a screenshot on a Dell computer without using Print Screen?
Use Windows + Shift + S to open Snipping Tool. It works on every Dell laptop and desktop and doesn’t require the Print Screen key at all.
4. Where do screenshots go on Windows 11 if I use a Dell laptop?
Screenshots taken with Windows + PrtSc are saved in the Pictures > Screenshots folder. Game Bar screenshots appear in Videos > Captures.
5. Can Dell laptops take scrolling screenshots of full webpages?
Yes, but you’ll need Edge’s Web Capture tool or a third-party program like Snagit or ShareX, since Windows does not support native scrolling screenshots yet.